Showing posts with label card. Show all posts
Tuesday, January 25, 2011

Valentine’s Workshop

DSC_0017

What: Make these adorable goodies for the Sweethearts in your life and see the NEW SPRING/SUMMER 2011 IDEA BOOK

When:
Tuesday, February 8th at 7 p.m. or Thursday,
February 10th at 7 p.m.

Where:
Shannon's home in Damascus

Bring:
scissors, paper piercer, adhesive (tape runner, glue dots, foam tape)

Cost:
$6 for 3 treat holders and one card (contact me for cost if you would like to make multiples of any item)

RSVP:
by Thursday, February 3rd to reserve your spot

CHECK BACK OVER THE NEXT FEW DAYS TO SEE MORE DETAILED PICTURES & GET MORE INFO ON EACH PROJECT!!

Friday, January 7, 2011

January Wings Workshop

DSC_0006

Join me on Thursday, January 20 at 7 p.m. or Saturday, January 22 at 11:30 a.m. to make this beautiful layout and the 4 cards shown below. Cost is only $10!! Or take advantage of the January Special in the Inspirations brochure. (see below for details)

Bring your own adhesive (tape runner, glue dots & foam tape), scissors and paper piercer. Also bring a glue stick if making the BONUS banner, (see below for details)

RSVP, payment , and order (if applicable), due by Thursday, January 13th (this is a firm deadline, as I must order supplies).

Please call or e-mail me ASAP if you wish to take advantage of the Wings WOTG/Inspirations Special!! Inspirations special is available only until January 31.

DSC_0118 DSC_0120 DSC_0122 DSC_0125

JANUARY SPECIAL: Upgrade to Workshop on the Go Kit for $29.95 and in addition to the layouts and cards you also get :
*a full Level 2 Wings paper pack (minus what is used for the workshop)
*the exclusive Wings WOTG stamp set (used on the layout and 2 of the cards)
*a package of black Mini-Medleys (minus what is used for the workshop)
*one Spray Pen (I am so excited to show you the fun new tool!!)
*a full-color workshop guide for these projects and a BONUS banner project which can also be created at the workshop with the purchase of a My Creations Banner (SCROLL DOWN FOR AN EXAMPLE)**
*the opportunity to purchase the 5 stamps sets from the Inspirations Brochure at a great discount (including the GORGEOUS Bohemian Alphabet, used on the layout above, for only $25--it retails for $34.95!!)
*the opportunity to get the January Stamp of the Month at a discount or free (and you don't have to spend $100 to get it free this month!!)
**regular shipping charges also apply to all purchases

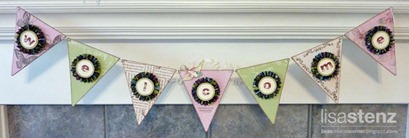
Here is an example of what you can do with the Wings kit & My Creations Banner. This banner was created by my talented Close to My Heart sister, Lisa Stenz.
bannerfinal_edited-1

Monday, November 1, 2010

So Many Thanks!!

DSC_0065

The month of November is the time we often stop to be thankful for the blessings in our lives. Perhaps you will take a moment to make a list and scrapbook about it, or maybe you will send a card to tell someone how much you appreciate them. However you choose to be thankful, CTMH has a way to make it a little easier and a lot more fun! This month’s Stamp of the Month is called A Little Thanks and it packs a whole lotta punch!

DSC_0063

Purchase this set outright for just $22.95, get it at a discount or even FREE with a qualifying purchase. Just ask me how!!!!

Nov SOTM

Thanks for Everything card supplies:

  • Magnifique Level 2 paper pack
  • A Little Thanks stamp set
  • Sparkles: Blue & Green Assortment
  • Exclusive Inks: Lagoon, Pacifica, Bamboo
  • 3-D Foam Tape
Saturday, October 16, 2010

October Rewind

On the eve of my second year of blogging, I thought it would be fun to revisit some of my favorite projects posted in Octobers past. I have seen this done on other blogs and I thought it was a fun idea! So without further ado:

October 2009—Happy Haunting card

image 

October 2008—Boo! box with a *surprise* inside

image

image

Friday, October 1, 2010

October Stamp of the Month

DSC_0076

Are you ready to start thinking about Christmas yet? I find it hard to focus on it until after Halloween most years. However, Christmas and papercrafting are ALWAYS a good combination. And the new CTMH Christmas line, Mistletoe, is too gorgeous to ignore!

I had fun with this paper set for my quality swap group. When I completed this card, I wasn’t sure I was happy with it. It seemed too plain. However, I have learned over the years to walk away from a project I am not happy with for a few hours and come back to it later, and I often find I actually like it as is. Once again, this proved true. When I came back and looked at this card the following day, it had a vintage (50s?) look to it to me. This snowman from the October SOTM is just too cute!!

DSC_0075 

You can also see used on this card the new Licorice Opaques (pearls) Z1335, the decorative brad is form the Mistletoe Level 2 embellishment pack Z1330 (which is GORGEOUS!), and the colored Sparkles Z1326. The sentiment is from the set Father Christmas D1449.

Monday, September 20, 2010

Even More Hooligans

Here are a few more projects made by my good friend, Dawn Ross. I just love how her projects show the versatility of this paper pack is. I can’t wait to make some birthday cards with it!!

DSC_0105

Love this card!! And I especially love how Dawn used one of the new Shimmer Designer Brads for the moon! How clever!!!

DSC_0104

I just love the colors in this new paper pack—including Lagoon (blue), Pear (green) and Sunset (orange). They are so bright and cheery!!

DSC_0107

DSC_0106

And look at the great new Mini-Medleys available in those same new colors! Buttons and ribbons and brads, oh my!!!

DSC_0109

DSC_0108

Isn’t that little monster from the Party Animal stamp set just adorable??

Thanks, Dawn, for sharing your BEAUTIFUL projects with us!!!

Wednesday, September 15, 2010

Another Look at Hooligans

DSC_0103

Look at these cute little guys!! I just love them! They are part of the exclusive stamp set that comes with the Hooligans Workshop on the Go. The best thing about these little critters is that the body parts are all separate stamps so you can mix and match to make all sorts of them!

DSC_0102 

My good friend and fellow CTMH sister, Dawn Ross, made this cute card and the one below. Check out all her amazing work on her blog, I am a Happy Stamper.

DSC_0101

Do you see that cute felt fellow? He is from the new Hooligans Level 2 Assortment. I love how he coordinates so perfectly with the stamped critters. This is such a FUN set to work with!!

DSC_0100 

Oooh, and if you look carefully you will see that Dawn used some of the new Opaques (colored adhesive pearls). I am sooooo excited that CTMH is finally carrying these. They add the perfect touch to so many projects!!

Be sure to check back in the next day or two. I am going to share a couple more projects that Dawn made with Hooligans!!

Sunday, September 12, 2010

Back Into the School Routine

As much as I love the freedom summer brings me, I do have to admit that it is sort of nice to be back into the old routine. Don’t get me wrong—I would take retirement in a second if someone offered me enough money—but the routine of school is nice!

DSC_0068

On another note, I am getting a little bit excited about Halloween already!! Perhaps it is because of the cute stamps and papers that CTMH just released. It could also be because of the fun things I got to make for my Quality Swap group.

I used the new Hooligans paper pack and the September Stamp of the Month for these two projects. Look carefully and you will see goodies from the new color Mini-Medleys—Pear (green) and Sunset (orange). You can also see two other YUMMY new colors used—Lagoon (blue) and Gypsy (purple).

6” x 6” card

DSC_0067

Take a look at this cool skull from the September SOTM. The new colored Sparkles make a great addition! (This may date me, but it reminds me of “One-Eyed Willie” from the 80s movie, Goonies!)

DSC_0085

This fun little treat holder is made with one of our 4” x 6” Flip Flap protectors. It is glued directly to the front of the Pear cardstock and the Gypsy paper is just slipped right inside the Flip-Flap. I attached the half-oval to the adhesive flap to make the “lid” and secured it with a piece of velcro. This would be cute with a gift card or movie tickets in it, too!

DSC_0086

Oh, and I found this PERFECT skulls & bones candy at Target. They come in a really cute “beaker” that will be part of my Halloween decor this year. I may even have to go back and get another one!

I just love this paper, and even though I wasn’t sure about the SOTM when I first saw it, I do love it now that I’ve played with it and plan to make a few more things to use to decorate for Halloween. I’ll share more when I get them done!

I know I keep promising to post a schedule of upcoming workshops and events. Right now our schedule is C-R-A-Z-Y, but I do hope to sit down and look a the calendar sometime this week and get things planned out. So keep checking back!!

Plus, I will be posting other projects made by my swap group over the coming weeks! The girls made some amazing things you won’t want to miss!!

Sunday, May 2, 2010

New Product Artwork!!!

Join me this week at my Tri-Annual Idea Book Reveal Party to make these cute projects!!

When: Thursday, May 6th at 7 p.m. OR Saturday, May 8th at 11 a.m.
Where: Shannon's home in Damascus
Bring: adhesive (tape runner & mini glue dots) and scissors
RSVP: needed by Tuesday, May 4th
Cost: $5 or FREE with a $25 order placed at the party

Splendor card

DSC_0001 DSC_0003

Cherry-O card

DSC_0004 DSC_0005

Zippidee gift card holder/box

DSC_0007 DSC_0008

Wednesday, April 14, 2010

Summer Idea Book Sneak Peek

I can hardly wait to share all the new goodies in the Summer Idea Book. The new papers and stamp sets are sooo fun!!! And just wait until you get a look at some of the new embellishments. This is an AWESOME new Idea Book, I tell ya!!!

Just to tease you, here is a sneak peek at a fun little card I made using some of the new products:

DSC_0002

And here is a sneak peek showing my FAVORITE paper pack from the Summer Idea Book:

2010_sum_exclusive_product_300.ashx

Doesn’t that look just *YUMMY*?!?!?!?! I can’t wait to show you some of the workshop projects I will be offering in the next few months!!! Keep checking back for other peeks in the next few days. Everything will be available to view on-line and order on May 1!!!

Tuesday, April 6, 2010

Mother’s Day Workshop

Join me on Thursday, April 22 at 7 p.m. to make this cute card set. It would make a great Mother’s Day gift for someone special in your life (maybe even yourself!)

DSC_0057 DSC_0058 DSC_0059

We will make the case and the 3 cards shown. Cost is ONLY $5!! Please contact me if you are interested in attending!!

supplies used (all CTMH, unless noted):

  • Veranda Level 2 paper pack
  • Veranda Creative Basics
  • A Tweet stamp set
  • One of a Kind stamp set
  • Say it in Style stamp set
  • sparkles—clear
  • pearls (non-CTMH)
  • grosgrain ribbon—olive (from a retired Creative Basics)

colors: juniper, olive, creme brulee, cocoa, tulip

size: 4” x 4” (closed); cards are 3” x 3”

idea from: lifted from Vicki Wizniuk (who got it from this gal)

Monday, April 5, 2010

Felicity Card

A while back Close to My Heart had the beautiful Felicity kit as the monthly special. Once again, I did not get samples made in time to promote the special, but I did finally manage to make something with it over Spring Break. This kit is BEAUTIFUL, fun, and easy to work with. The card design is from the full-color guide that comes with the kit. I do have a couple of extra kits, so contact me if you are interested in purchasing one!

DSC_0021

This card uses papers & stamps from the Felicity kit, bamboo & desert sand cardstock, colonial white brads & bitty brads, colonial white grosgrain ribbon, and a bamboo ribbon slide. The sentiment stamp is from Paper Trey Ink.

The colors are twilight, sorbet, olive, bamboo, desert sand & colonial white.

Card dimensions: 5” x 7”

Tuesday, February 2, 2010

Sweetheart Goodies

Valentine’s Day is just around the corner and I love to make special treats for the Sweethearts in my life. Join me on Thursday, February 11th at 7pm to make these cute little cards and goodies for the special people in your life!! Please RSVP by Tuesday, February 9th and be sure to bring your scissors and adhesive!

DSC_0249

Candy Tube & Card supplies (all CTMH unless noted):
In the Month of February stamp set
Star Power stamp set
Intrinsic Backgrounds stamp set
Connections stamp set
Whoops-a-Daisy Level 2 paper pack (retired)
Textured cardstock—Summer Celebration
white embroidery floss
pink sheer ribbon (Offray)
test tube (PTI)
colors: watermelon, cranberry, black, grey flannel, white daisy
card size: 3” x 3”

DSC_0243 DSC_0245

Chocolate Heart Card & treat holder (all supplies CTMH unless noted):
In the Month of February stamp set
Say it In Style stamp set
Enjoy the Journey stamp set
That’s Amore Level 2 paper pack
Blush ricrac
Chocolate Mini-Medley
textured cardstock—Winter Cozy
colors: blush, chocolate, tulip
card size: 3” x3”

Friday, December 4, 2009

A Prize Winning Card

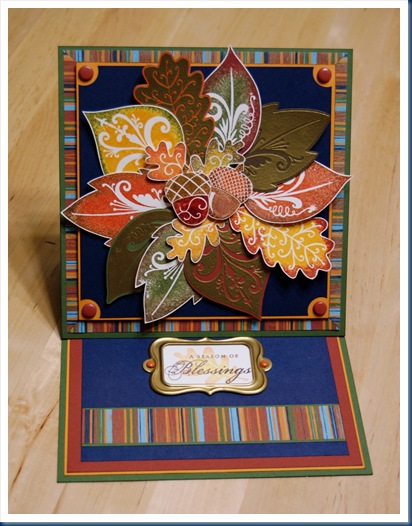
I have been urged by my good friend and fellow CTMH consultant, Dawn, to post this card, so here goes……… Despite some amazing competition, I managed to win the card contest at our recent CTMH Regional Celebration here in Portland with this little beauty. It was my first CTMH event and my head was already spinning with all the great classes and projects I was lucky enough to enjoy. This win was just the icing on the cake!!! Thanks to all my CTMH sisters who voted for my card!

DSC_0014

I have seen versions of this “easel” card all over the blogging world, so I don’t know who the original credit goes to. But whomever you are—THANKS!!!

DSC_0013

The funny thing about this card is that I wasn’t even going to buy this stamp set. CTMH has another cute leaf stamp set that also debuted in the recent Autumn/Winter Idea Book and I decided to buy it and told myself I DID NOT need another leaf set. However, one of my customers fell in love with this set and decided to order it. It happened to be delivered right before the All-Day Crop I was holding, and as soon as I saw it in person I wanted to try it out. Luckily, said customer was my mom and, of course, she let me play with it at the crop. Needless to say, I fell in love with it and this card was born (and I bought the set for myself, too). So, thanks also go out to my mom, DiAnne, for buying this set in the first place!
DSC_0011

Some of the leaves are embossed with gold on several different colors of cardstock. The other leaves are made with a technique called “stamp rolling.” To achieve this look, ink up your image with the base color (usually a lighter color), then lightly “roll” the edges of your stamp image in a second color (usually a darker color). Then stamp on your paper, as usual.

The acorns are first stamped with colored ink, then stamped again, directly over the image, with VersaMark and embossed with clear embossing powder. (Gotta love the clear stamps!) The leaves and acorns are then layered together with foam tape to give the wreath dimension.

The leaf behind the sentiment is done with the rolling technique, and then stamped “second generation.” In other words, I stamped first on scratch paper to remove most of the ink, and then again on the project. This gives the lighter, sheer look to the image. I stamped the sentiment directly over the leaf image.

Since CTMH only makes the Foundry Bookplates (Z1147) in pewter and I needed something in gold, I tried embossing them. Guess what? It worked!! Press the Bookplate into a VersaMark ink pad then emboss with gold embossing powder. If there are little nooks and crannies that don’t get covered, just touch them up with an embossing pen and more powder. Reheat and you have a gold bookplate!

The stamp set used is called Flourished Blessings (D1379) and the paper is from the set, Back Country (X7110B). I used a wide variety of colors including Outdoor Denim, New England Ivy, Autumn Terracotta, Cocoa, Honey, Goldrush, Barn Red, Chocolate, Desert Sand & Colonial White. Also in the mix are Autumn Terracotta brads & Barn Red Bigger Brads, along with the aforementioned Bookplate.

This card is a little larger than standard, 6 1/2” x 6 1/2”, to accommodate the wreath. The wreath is my own original design.

Friday, October 16, 2009

Just a Tad Late!

Here is a card I made for my quality swap group using the September Stamp of the Month, Treasures. I made the top card originally and wasn't happy with how it looked at first. After the ink from the sentiment was dry (and darker) I decided I liked it. Unfortunately, I had already changed to the second card and made all I needed. For both cards, I stamped the flower with VersaMark ink and embossed it with clear embossing powder. Then I sponged Sorbet all over the flower and wiped the excess off that the embossing resisted. I also sponged a little bit of Crystal Blue to make it look like sky behind the flower.


On this one I stamped the sentiment with brown Staz-On OVER the embossed image. I think next time I will try stamping the sentiment directly on the card first, and then stamping and embossing OVER it. Not sure it would remain clear (to my satisfaction), but it would be worth a try!


For this version I stamped the sentiment in Chocolate on Colonial White. Then I stamped over it with VersaMark and embossed with clear embossing powder. I think I would have liked it better if I had used Cocoa instead of Chocolate. It would have been darker and stood out more. Oh well!

supplies used (all CTMH, unless noted):

  • Twitterpated Level 2 paper pack
  • Treasures stamp set(September Stamp of the Month)
  • designer ribbon rounds—sorbet
  • VersaMark ink
  • clear embossing powder

colors: sorbet, chocolate, crystal blue, sweet leaf, colonial white

size: 5 1/2” x 4 1/4”

idea from: I'm sure I saw a card with this layout somewhere, at some time............


Posted by Picasa